by Steve Rock
Instructions updated March, 2023

General notes
- It is very difficult to visualize how the pieces fit together without a completed mitt for reference, but follow the directions and you’ll do fine.
- Most of the outside of the mitt should be smooth rubber to minimize evaporative heat loss. The small piece (that surrounds the palm opening) should have nylon on the outside for wear resistance, and it’s best to have it on both sides.
- If you’ve never glued wetsuit neoprene, practice with scraps first, starting simple with straight pieces. Then glue a straight and a curved piece together, and finally practice stretching just one side as the two sides are stuck together.
Downloads
- Downloadable PDF instructions
- Large mitt piece 1
- Large mitt piece 2
- Small mitt piece 1
- Small mitt piece 2
Sizing
- The large size is snug (not too snug) on a hand with a 9 inch circumference palm.
- The small is suitable for a 7.5 inch circumference palm.
- The small size is 90% of the length of the large and the width (circumference) is 95% of the large. Use that ratio for creating bigger or smaller patterns.
Materials
- 2-4 mm wet suit neoprene, one side nylon for the main piece (1/8 inch is 3.4 mm). (Thicker material allows stronger glue joints.)
- 2-4 mm wet suit neoprene, two sides nylon for the small piece.
- Use wet suit contact cement (not Aquaseal), and follow product directions. (Glue contains MEK (methyl ethyl ketone) and toluene. Google the toxicology; judge your ventilation; and use an organic vapor respirator if you want.) Gluing should be done at room temperature, more or less.
Instructions
- Print the pattern sheets. (Each size pattern requires two 8.5 x 11 sheets.)
- Verify that the pattern prints full size: the boat shaped cut-out should be 2.87 inches long for large size and 2.7” for the small. Assemble the sheets along the dashed lines to make one large and one small pattern.
- Cut out and trace the larger pattern onto the nylon1 neoprene. Trace the smaller pattern onto the nylon2 neoprene. Flip both pattern pieces over and trace the other mitt.
- Cut the pieces. The boat-shaped cutout is optional but results in a more form fitting mitt.
- Coat all edges to be joined with glue and allow to dry per glue instructions. On the small piece this is the convex perimeter from P to O plus about a half inch past O onto the inside. On the main piece it is all edges except from K to L.
- Apply another coat of glue to the boat shaped gusset of the main piece, and close it up when glue is mostly dry but still tacky.
- Apply glue and close the darts: A through I and the thumb: J.
- Fold the main piece lengthwise and glue the seam up the side of the wrist (K-K, L-L, M-M, N-N). Minor stretching of one side or the other may be necessary.
- Start gluing the small piece to the main piece. Apply glue to both pieces O to G. The distance between O and J on the bigger piece is less than O to J on the smaller piece, so stretch the bigger piece as you assemble the two pieces. The match points on the two pieces don’t have to match perfectly, but try to get them close.
- Continue gluing. From J to I the small piece will have to be stretched substantially. After that less stretching is necessary to make the opposing points match.
- Continue gluing. Point N is a three-way intersection. From there to the end (P) the small piece will need to be stretched. (It should overlap onto the far end of itself a quarter inch or more per the pattern.)
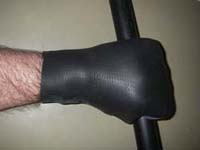
- Congratulations! You've made one mitt. You’ll have to stretch it to get it on. Full glue strength may take a day or two, but if your technique is good, you can try it on immediately. Trim back the opening if desired.
Back to Technical and Gear